

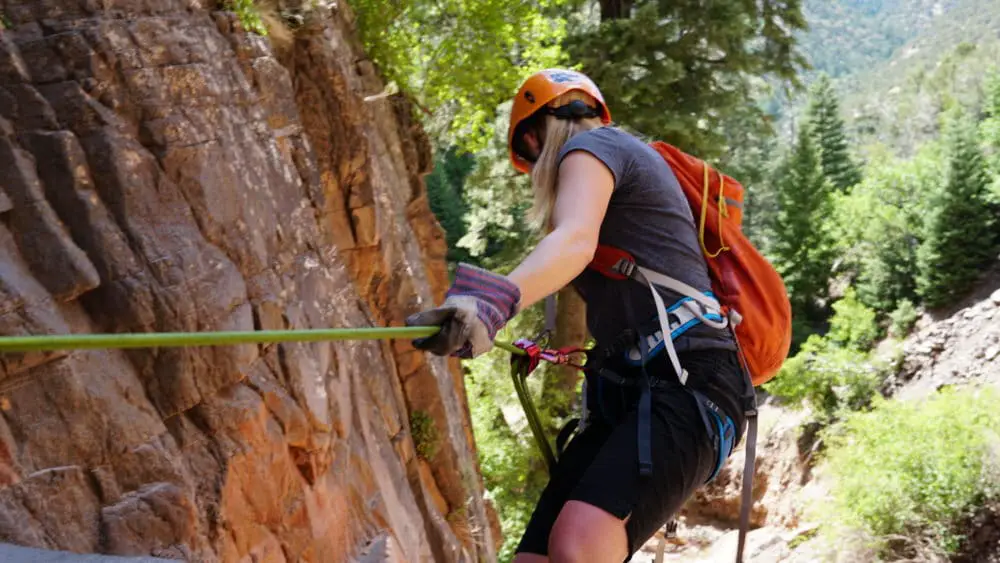
If you are even the least bit familiar with rock climbing, you know what a belay device is. A BD is what makes climbing safe. When used correctly, a belay device uses friction to reduce the force needed to keep a climber from falling. Without a belay device, the person on the ground would need to hold a rope in their hands to stop a falling climber. This would inflict serious rope burns, and would definitely result in ground falls.
Belay Devices are great for rock climbing, but do they work for rappelling?
Yes, you can rappel using the vast majority of belay devices. The names belay device and rappel device are almost always used interchangeably. Belay Devices are safe to rappel with, but you need to know how to properly use them. There are a lot of different belay devices on the market today, and they each have slightly different applications and benefits.
The original mass-produced belay device was a sticht plate, followed by a figure-8 . Over time, climbing gear companies have made slight modifications to the designs, inventing tubers or ATC’s, and even ‘autolocking’ devices like the popular GriGri. Depending on your intended use and your overall dedication to climbing, rappelling, or canyoneering, the best belay device for you will vary. There are a few devices that do well with everything, but it is best to specialize if you know what you will likely be doing.
Which belay device is the best for you? This guide will help you decide what you need to be safe.
Different kinds of Belay Devices
All of the different styles of belay devices fit into three categories: Tubular, Figure-8, or Assisted Braking. All can be good options for rappelling, though they each have their pros and cons. The best one for you will likely be a combination of 2 or more used in specific situations.
Tubular Belay Devices
Best For: belaying trad & sport climbers, multi-pitch climbs, and rappelling
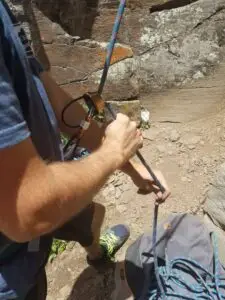
Tubular belay devices have become synonymous with the name “ATC” (Air Traffic Controller) given them by Black Diamond. Pretty much every climbing hardware manufacture, from Petzl to Grivel, has their own version of an ATC. The tuber is an improvement on the original Sticht plate, increasing the height of the slot and adding a keeper loop. The functionality is essentially identical.
The static or dynamic rope is pinched through the slot or slots of the ATC and then clipped through a carabiner. The rope feeds into the device, around the carabiner, and then out back through the slot and down towards the braking hand. When belaying a rock climber or rappelling, the ATC is often pressed against the top of the carabiner, significantly increasing the friction in the system and slowing the rope. It is released by adjusting the angle of the brake hand upwards towards the device, or by pulling the belay device away from the carabiner.
A tuber usually won’t stop completely unless the climber/rappeller is very light, so it’s important to secure the brake hand on the rope firmly. Unlike other rappel devices which can be locked off mid-rappel, you can’t really stop and go hands-free.
One thing to watch out for is that tubular devices only work with certain rope sizes. If a rope is too thick, it simply won’t fit through the slots. This actually happened to me last year while going through a canyon in Zion National Park. Fortunately, I had an extra 8 ring in my pack. Keep that in mind if you decide to rely solely on an ATC as a belay device. Additionally, an ATC can get gummed up by ‘canyon crud’ in especially nasty conditions.
Tubular Belay Devices are really pretty cheap. A basic ATC is around $15 USD, while a more expensive ATC-Guide or Petzl Reverso is around $20-$30 USD. Much of the wear from rappelling is inflicted on the carabiner, which can save you some money in the long run. Alternate using each of the two slots when you rappel so you don’t wear through one faster than the other.
As it wears out, the brake side of the ATC slowly sharpens until it can actually damage a rope. Discard it before that happens, or flip the device and brake off of the other side. Either side can be used, and they usually create different amounts of friction based on whether they have ridges or not.
I wrote up a whole article about ATC-style belay devices, and the pros and cons of climbing and rappelling with them- read it here.
Variations of Tubular Belay Devices:
Basic: The basic ATC just has two identical ovular slots. The friction is the same either way you set up the device. These are the cheapest to get ahold of, and do last a long time. They don’t put as much friction on the rope as other options, so keep a firm grip on the brake.
ATC-XP: These are the most common tubers you’ll see. It’s a step up from the basic model because it adds a ridged channel for the rope to go through on one side. They usually run at about $15. Every climbing brand makes their own version.
ATC-Guide: The most popular guide device is the Petzl Reverso. The guide-style devices include extra loops on either end so that the device can be clipped to an anchor and rigged as an assisted braking device when doing a multi-pitch climb.
ATC Pilot: ATC’s come in two ‘sizes’ (for lack of a better word). While the majority have two slots, the Black Diamond ATC Pilot only has one. It works as a cross between the regular ATC and an assisted braking device. It is one of the few belay devices that really isn’t designed to rappel from. If you plan on using a belay device for rappelling at some point, you definitely want one with 2 slots so you can rappel both strands of the rope if needed.
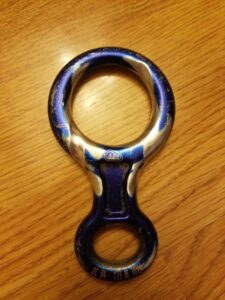
Figure 8 Style
Best For: rappelling and canyoneering
The basic 8 ring has been around since the dawn of modern climbing. They are used mostly as rappel devices, but can be used to belay as well. They are very versatile, and are my descender of choice for canyoneering applications; however I don’t recommend using them for belaying climbers because there are so many better options.
There are several advantages to rappelling with a figure 8 device. They are very easy to set up, and dissipate heat easily. The friction is applied smoothly through the device because there aren’t any sharp corners or edges. This makes for a very comfortable rappel, and often lets you go faster and even try other rappelling tricks. You can lock off a rappel with even a basic 8 ring, stopping yourself halfway down a cliff.
8 rings will fit a single or double rope rappel, and will fit any size climbing or rappelling rope. There are different ways to rig a figure 8 rappel, including a canyoneering-specific setup for easy release into water. With some of the 8-ring variations listed below, you can easily adjust the amount of friction and speed of the rappel after going over the edge. This is crucial for rescue work and exploring new places.
The downside to the figure-8 belay device is with respect to climbing. I do see people belaying with an 8 ring occasionally, but it is always set up incorrectly. They usually set it up the same way it is set up to rappel- with the rope around the neck of the device. This does not apply much friction to the rope, which can lead to ground falls if the belayer isn’t paying perfect attention or lessens his or her grip on the rope.
The manufacturer instructions say to pinch a bight of rope through the small ring and around the carabiner like a sticht plate. The functionality is fine, but an ATC is much more convenient.
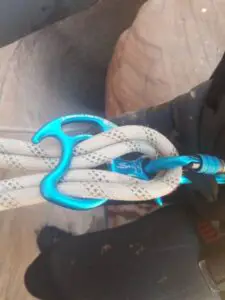
One of the biggest risks is cross-loading a carabiner. If the 8 ring catches on the gate of the carabiner and pressure is applied in a certain direction, the pin in the carabiner will pop and you will fall. Read more about this risk and how to avoid it in this article.
Variations of Figure-8 Belay Devices:
Basic: With a regular 8 ring, you can easily rappel and belay. They last a long time, and have no additional bells and whistles. You can’t really mess it up, as it’s really simple. They do come in different sizes- smaller ones apply more friction and are slower. This is a great rappel device for beginners.
Rescue 8: The only difference between this and the basic 8 ring is that this adds ‘horns’ or ‘ears’ to the top. The idea is that you can wrap the rope around the ears on top and modify the friction mid-rappel. These are usually bigger than the basic 8 ring, which gives you a wider range of speed.
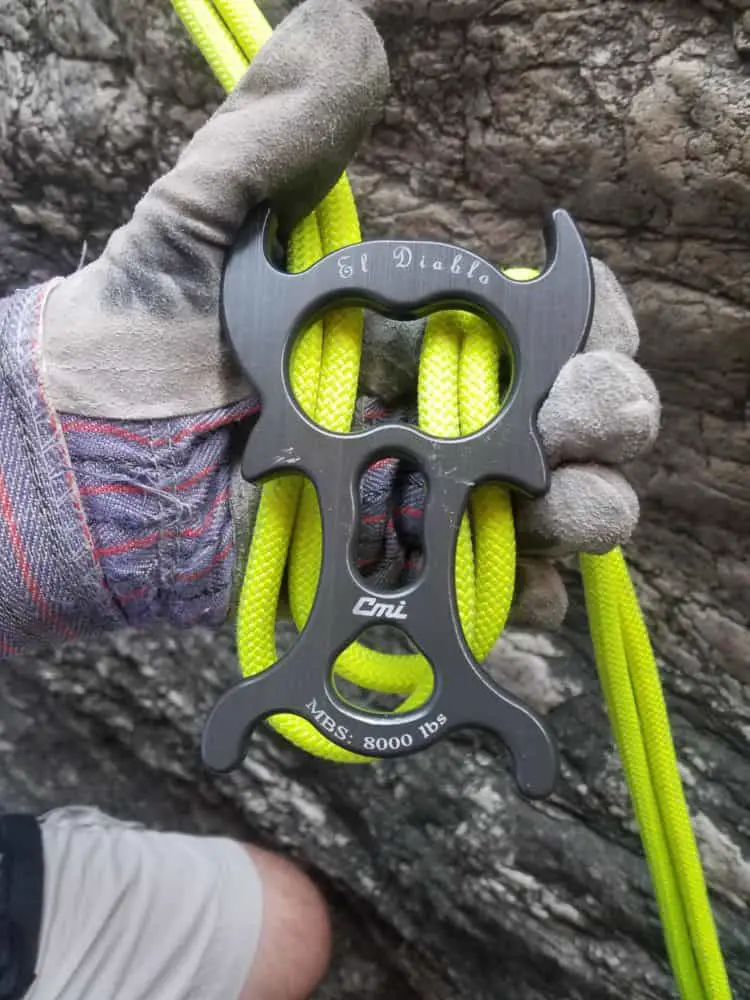
Others: In recent years, every gear company has come out with their own version of a complex 8 ring. The most common is probably the Petzl Pirana. My brother loves his Kong Oka because it is easy to adjust the friction mid-rappel (though he also likes using a rappel rack for some reason). My dad uses the CMI “El Diablo” and loves all of the extra orifices which allow for different setups. I think he just likes saying the name with a spanish accent! One that has gained a lot of attention for its versatility in canyoneering is the Rock Exotica Totem.
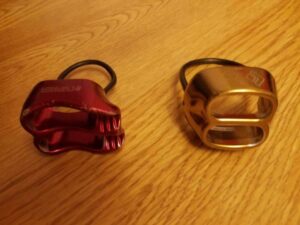
Assisted-Braking Devices
Best For: belaying trad & sport climbers- single pitch, inexperienced belayers
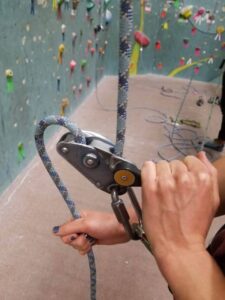
Assisted-braking belay devices, the most famous of which is the Petzl GriGri, are designed to completely stop a falling climber- even if the belayer isn’t completely focused. They are commonly known as ‘auto-locking,’ though this name is rejected by the manufacturers for legal reasons due to the illusion of perfect safety.
In terms of safety, assisted-braking belay devices can’t be beat. If a belayer were to be hit in the head by a rock and incapacitated (or if he were just flirting with another climber nearby) then the belay device would stop the climber from falling. Some people rig these to a tree or other stationary object and use them to climb solo because it *should* stop them if they fall (not recommended by me or the manufacturers).
The basic idea is that a slow-moving rope will go through the device just fine, but a quick jerk will apply an internal camming mechanism that arrests a fall. Although some climbers complain about them saying that new generations will never learn how to properly belay, or that it teaches or at least allows for bad habits, I think these ‘auto-locking’ devices are the future. They significantly reduce the risk of human error in the system, which should reduce accidents overall.
Each of the different brands and styles have a little bit different setup, and differing levels of stopping power. Some of them cause a complete stop almost immediately, and some take an extra split second to slow, and don’t stop completely without belayer assistance.
Unfortunately, most assisted-braking devices only work with a single strand of rope. This means you have to set up a rope block on one side in order to rappel. Additionally, they won’t work with ropes that are too thick, and can get completely gummed up in canyon sludge. Not the most versatile of rappel devices. You can rappel with most of them, but they aren’t as good as ATC’s or 8 rings.
Variations of Assisted-Braking Belay Devices:
Active Device: These belay devices have moving parts inside. They are heavier than regular belay devices, and significantly more expensive. They usually only work with one strand of rope, which means you can’t do a standard rappel down both strands. They are designed to reduce or even eliminate human error in belaying, which makes them very popular among single pitch climbers. These have started to be required for use in climbing gyms around the world, so you’ll probably run into them somewhere. The Petzl GriGri is the most common, but there’s also the Wild Country Revo and the Trango Vergo, among others.
Passive Device: This style of assisted-braking belay device doesn’t contain any moving parts. They are more true ‘assisted-braking’ devices, because they don’t have the same stopping power as active devices. These are a little cheaper, but still do a better job arresting a fall than an ATC. The two most common are the Edelrid MegaJul and the Black Diamond ATC-Pilot.
Which Belay Device should I use?
I carry an ATC-XP and an 8 ring with me in every canyon I do. I usually use the 8 ring to set up an 8 block single rappel, and rappel with the ATC. If needed, I can rappel both strands of the rope with my 8, or use a carabiner block or knot block instead. I use a Beal Birdie (like a GriGri) for gym and single pitch climbing as well, but they’re a lot pricier than other devices. I’ve used them in climbing gyms a lot, and I like the added peace of mind they provide. You can see the specific belay devices that I actually use in our recommended gear guide.
In selecting the perfect belay device for you, you need to ask yourself these 4 questions:
What is your intended use?
Are you going to use it for rock climbing only, or do you intend to do a lot of canyoneering or rappelling too? If you only plan on doing single pitch rock climbs, or especially if you spend most of your time in the climbing gym, an assisted-braking belay device is probably best. If you plan on doing some multi-pitch rock climbing, then there’s some added risk that you may need to rappel both lines and an active device won’t work.
If you plan on getting into canyoneering or rappelling, then you probably want an ATC or 8-style device. They are more convenient for rappelling, and are more versatile. I like using an 8-ring the best for canyoneering, because it fits any rope diameter and has no risk of getting gummed up by mud and canyon gunk. In a best-case scenario, you bring an ATC and an 8 ring so you can set up an 8 block and rappel one strand.
Who is your intended belayer, or how experienced is your crew?
It may be hard to teach an old horse new tricks. If your crew is used to using assisted-braking devices and you get something that requires more grip strength and attention, you need to make sure they are comfortable with the new setup. All it takes is one inattentive moment when belaying for someone to fall. The same goes for switching to an active device. It can be hard to change something as fundamental as belaying.
An assisted-braking device is probably easiest to use for a new belayer, though it kind of cheats them out of ‘the experience.’ This is why a lot of climbing gyms have permanent grigri’s on the ropes for guests to use.
What diameter are your ropes?
If you have a rope that is thicker than about 11mm, you need to use an 8-ring. I got caught in a canyon one time with a really thick rope I was unfamiliar with. It wouldn’t fit through my ATC-XP, so we had to pass another person’s 8-ring back up to me at each rappel. It’s always good to have an extra 8-ring in your pack for emergencies. Assisted-braking devices are only good for certain rope thicknesses, so watch out.
Will you rappel single or dual-strand?
The most common standard rappel is to thread the rope through the anchors and rappel down both sides of the rope. This will not work with assisted-braking devices, as they only permit a single line to go through. Set up some sort of a rope block in order to rappel a single rope, or do both with a tuber or 8 ring.
A few other questions you should ask yourself include: What is your quest? What is your favorite color? What is the airspeed velocity of an unladen swallow? They may not help in picking a belay device, but I’m sure the right answers will come in handy somewhere!
How expensive are Belay Devices?
Belay devices are pretty cheap compared to the other equipment that you need in your rack to be able to climb or canyoneer, such as a rope or set of quickdraws. Belay devices range in price anywhere from around $15 USD for a basic ATC to around $100 USD for an assisted-braking device like a GriGri. Many climbers own a cheap ATC that they can use to rappel or climb with, and eventually buy a more expensive device as they get more into climbing.
Belay Devices last a pretty long time, so it’s not a huge investment. In certain conditions, belay devices wear out very quickly. I burned through a figure-8 device in while doing 4 rappels in a canyon in Arches National Park in southern Utah when conditions were wet and muddy. The added friction from the sand on the rope made rappelling significantly more difficult, and acted just like sandpaper sawing through the 8. The BD ended up with deep gouges that went through the paint and into the metal. Keep that in mind when rappelling in poor conditions!
Can you buy a used belay device?
While you can look at buying belay devices used, it definitely increases the risk. Because the devices take such a beating in regular use, they may have compromised structural integrity due to being dropped off of a cliff or smashed against a rock. Watch out for hairline cracks and places where the metal is wearing through.
This also applies for inspecting the belay devices that you already have and use. They do wear out over time, so it’s important to make sure they are safe. Feel the inside where the rope runs for any burrs (metal slivers) that may damage the rope.
Belay devices are largely inexpensive, so I think it is worth having several so that you can use them in the best situations. In the event that you drop one while climbing or rigging a rappel, having an extra in your bag is much more convenient than having to rappel without one!
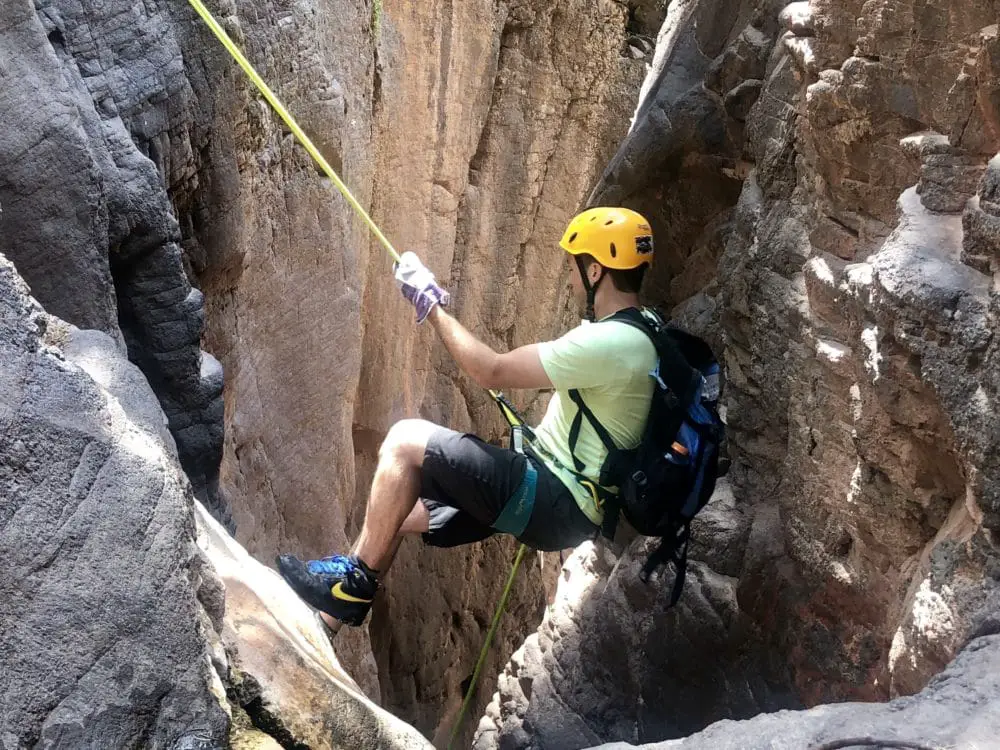
How to Rappel with a Belay Device
Although every belay device is a little bit different, the principles for rappelling are pretty much the same. It’s important for beginners to go with someone who can ‘show you the ropes,’ or to take a training course and get certified. We wrote a full article about how to rappel using a belay or rappel device, which you can find at this link. Here are the simplified steps below-
- Put on your harness and secure the waist belt and leg loops
- Tie the rope through the anchors, or create an anchor out of a sturdy object
- Thread rope through belay device as per directions and lock carabiner
- Double check the full system, making sure that carabiners are locked, harness is tight, and anchor is secure
- Call out to your belayer if doing a fireman belay, or set up your rappel backup if not
- Secure one hand on the uphill side of rope, and one on the downhill side (brake hand)
- Step back feeding the rope through the belay device, without letting go with brake hand
- Lower yourself over the edge until you’re perpendicular to the cliff face
- Walk down the surface, slowly letting the rope slide through both hands
- Pull the brake hand behind you to stop, or let it swing away from your body to go
- Disconnect from rope upon reaching the ground
Be safe out there! Don’t take any added risk than what you are comfortable with. Belay devices, when used properly, make rappelling completely safe. Seek out professional training and certification where available, and learn how to use your belay device on solid ground before testing it out a hundred feet in the air!
See Also:
The Complete History of Rock Climbing
How Much Are Rock Climbing Shoes?
Top 10 Most Common Rappelling Accidents- How to Stay Safe Rappelling