
Rappelling involves lowering yourself (or having someone else lower you) from an area of higher elevation to an area of lower elevation. That could mean a cliff, a mountain, or a boulder, or could also mean some sort of man-made structure, such as a house or building. My dad talks about climbing to the top of a water tower during the middle of the night after a rainstorm and rappelling down afterwards. In the morning, people couldn’t figure out how there were muddy footprints going up the side! Different times- now you would probably be arrested. Rappelling always makes for an adventure! Although it may seem dangerous, when executed properly rappelling can be safe 100% of the time.
How to Rappel:
- Step into your harness and secure the waist belt and leg loops
- Tie rope through the anchors, or create an anchor out of a sturdy object
- Thread rope through belay device and lock carabiner
- Double check the system, making sure carabiners are locked, harness is tight, and anchor is secure
- Secure one hand on uphill side of rope, and one on downhill side (brake hand)
- Step back feeding the rope through the belay device, without letting go with brake hand
- Lower over the edge until perpendicular to the cliff face
- Walk down the surface, slowly letting the rope slide through both hands
- Pull the brake hand behind you to stop, or let it swing away from your body to go
- Disconnect from rope upon reaching the ground

What Gear is Needed to Rappel?
We wrote a full guide to what gear you need to Rappel , but for now here’s the short list-
- A Helmet to protect your head if someone kicks a rock off the top
- A Static Rope (Static for Rappelling, Dynamic for Climbing). Check out our Rope Guide
- A Harness to secure the rope to your body. Sure, you can try rappelling without a harness if you really want to
- A Carabiner & Belay Device to run the rope through. There are many, many different kinds of belay devices
- Gloves, unless your hands are already made of leather
Two Types of Rappelling
There are two general types of rappelling, and both are very different, though the purpose is the same. Rappelling after a rock climbing ascent is very different from rappelling off of the top of a cliff. Both pretty much require the same gear, but use entirely different techniques.

Rappelling Down from a Climb
If you start on the ground with the intent to climb to the top, you will have the rope tied with a figure 8 knot into your harness. You climb up to the top, and have to find a way back down again unless doing a multi-pitch climb or mountaineering route. Although some routes have a ‘walk off’ option, most require a rappel to return to the ground.
When Rappelling off of a climb, the climber first needs to make sure the rope is taut. Call out to the belayer to ‘take’ the rope, and then signal that you are going to descend. This can be done by yelling out “On Rappel.” The Belayer responds “Rappel On,” to which you call out “Rappelling” once you are ready to go.
Let go of the cliff face with your hands and lean back until your feet are straight out in front of you. It’s usually best to grab ahold of the rope just above your harness to keep your hands out of the way. As the belayer lets out rope, walk down the cliff keeping your feet straight out in front of you until you reach the ground.

How to Rappel (from the top of a cliff)
Most rappelling accidents occur before the rappeller even ties into the rope. The very nature of rappelling is dangerous- stepping up to, and eventually over the edge of the cliff.
- Step into your harness and secure the waist belt and leg loops
- Tie rope through the anchors, or create an anchor out of a sturdy object
- Thread rope through belay device and lock carabiner
- Double check the system, making sure carabiners are locked, harness is tight, and anchor is secure
- Secure one hand on uphill side of rope, and one on downhill side (brake hand)
- Step back feeding the rope through the belay device, without letting go with brake hand
- Lower over the edge until perpendicular to the cliff face
- Walk down the surface, slowly letting the rope slide through both hands
- Pull the brake hand behind you to stop, or let it swing away from your body to go
- Disconnect from rope upon reaching the ground
1. Step into your harness and secure the waist belt and leg loops
Step through the waist belt into the leg loops and adjust the harness as needed, tightening the waist strap and the leg straps so they are secure. Any twists in the harness and straps will pinch you once weight is applied. The waist belt should rest above your hips, and should be tight enough that you can’t slide it down over your hips. Leg loops should be tight, but not so much that you can’t move or that it restricts blood flow. Tighten them until you can fit two fingers in between the loop and your leg. Some older harnesses require you to double each strap back through the buckles.

2. Tie rope through the anchors, or create an anchor out of a sturdy object
Many places to rappel already have climbing bolts or anchors secured to the rock. Other places may require you to create your own anchor with webbing by tying off to a tree or boulder. Our anchor building guide teaches everything you need to know. Use climbing rated tubular webbing and a quick link or rap ring to build your anchor, and test it as best you can before committing to the rappel. When constructing an anchor near an edge, tie or clip a safety tether around yourself in case you stumble or lose your balance. Most rappelling accidents occur while tying into the anchors.

3. Thread rope through belay device and lock carabiner
There are tons of different belay/rappel devices you can safely use to drop down a cliff. 8 rings and ATC’s are the most common, but in recent years climbing companies have invented tons of different options. Check out or guide to some of the most common belay devices. While all belay devices are different, the idea behind them is the same. Thread the anchor (uphill) side of the rope through the device, through the carabiner (in most models), and then into your downhill hand.
One common rappelling accident occurs when the rappeller neglects to lock the carabiner. Carabiners are either auto-locking or screwgate, but both are susceptible to this fallacy. That’s why we include the following step!
4. Double check the system, making sure carabiners are locked, harness is tight, and anchor is secure
Double check, then triple check the whole system! Whenever possible, have a partner check as well. There’s no substitute to having another set of eyes look at the system and make sure you are safe. The majority of accidents can be avoided by simply having someone else idiot-proof your harness setup. Specifically, make sure the rope goes through the belay device properly, make sure the harness fits snugly, and make sure the carabiner is locked. Test the rope by leaning into it before fully committing to the rappel.
Consider using a rappel backup. This ensures that, should you lose control of the rappel or become incapacitated by a falling rock, you won’t ‘deck.’ The most commonly used rappel backup is a fireman’s belay, but it does require a person to already be at the bottom. Another good option if you are the first one down, is to use a Prusik hitch. Either of these options makes it so you stop descending if you let go of the rope. Check out our guide to rappel backups for more information.
5. Secure one hand on uphill side of rope, and one on downhill side (brake hand)
If you’re right-handed, the left hand grabs the rope going from your belay device to the anchor and your right hand holds the rope behind your back on the other side of the belay device. If left-handed, the rope wraps around your left side and you switch hands. Your dominant hand should be used as your brake hand. Lean back into the rappel and feel the system absorb your weight.

6. Step back feeding the rope through the belay device, without letting go with brake hand
Whenever possible, harness up and clip in several feet from the edge. This not only keeps you safe from an accidental fall, but also gives you some space to get used to the motions before going past the point of no return. Loosely grip the rope in both hands and let the rope slide through them. In order to descend, pull the rope in your downhill (dominant) hand away from your body and let the rope slide through your hands (this is why leather gloves are nice).
To stop, grip the rope tightly in both hands and pull the rope behind you with your downhill hand. To go faster or slower, adjust the distance of the rope from your body. As a general rule, never let go of the downhill side of the rope while rappelling.
If using a rappel backup like a Prusik, slide it down with your uphill hand in order to descend. If you let go with your uphill hand, the Prusik will stop your progress.

7. Lower over the edge until perpendicular to the cliff face
The most difficult part of rappelling is actually going over the edge. Most beginners want to keep their feet below them with the idea that they could maybe grab the cliff if the rope gave out. This is a perfect way to absolutely smash up your knees on the cliff face! This happens all the time at summer camps with beginners.
The proper technique (and safest way) is to step over the edge and plant your feet. Then slowly let out rope until your legs and torso form a right angle and your legs are perpendicular to the cliff face. At this point, you can safely descend.
8. Walk down the surface, slowly letting the rope slide through both hands
Slowly let the rope slide through your hands while walking down the face. Maintain the 90-degree angle at all times. Don’t let your feet get too far above or below you. As you get more advanced, you can speed things up, and experiment with small jumps and other techniques.
9. Pull the brake hand behind you to stop, or let it swing away from your body to go
If you need to stop or take a break, hold the rope tightly and pull your brake hand behind your back. The increased friction in the rope and belay device will stop you from descending. To continue on, pull the brake hand out away from your body and let the rope continue to slide. Again, you can adjust the speed of your descent by moving your brake hand closer to, or farther away from your body.
When using a fireman’s belay, one of the best rappel backups, the person on the ground holds the rope in their hands and can simply pull on it so arrest the descent of the rappeller.

10. Disconnect from rope upon reaching the ground
As you near the ground, slow down. This will make the landing softer on your feet and knees, and will make sure you don’t accidentally fall down onto your back. Once safely on the ground, take a deep breath! Let out a little bit of slack and unscrew the carabiner.
Unthread the rope from the belay device, and call out to the subsequent rappellers that you are ‘off rope.’ Unless you are belaying the others, stay out of the dropzone. You don’t want to catch an errant rock in the head!
Different Rappelling Techniques
There are many different alternative rappelling techniques. With practice, you can try some of them. Standard rappelling is the safest, but these other variations or types or rappelling provide an extra boost of adrenaline! Don’t try these at home- (try them out in the wild!). We explore these techniques further in this post–
Different kinds of rappelling include:
- Standard rappel- the technique discussed in this article
- Inverted rappel- on an overhang, swing your legs up above your head and descend head first
- Simultaneous rappel– rappellers descend both sides of the rope at the same time, countering each others’ weight
- Australian (Aussie) rappel– rappel face first instead of backwards
- Angel jumping- combination of the Aussie rappel and the Military rappel. Dangerously fun
- Military rappel- rather than walking backwards down the cliff face, try different sized jumps in order to get down faster
- Tandem rappel- rappelling with two people connected to one belay device. Generally used in rescue work if one person is incapacitated or injured
- Free Rappel- rappelling over an overhang, where a section of the rappel is free hanging
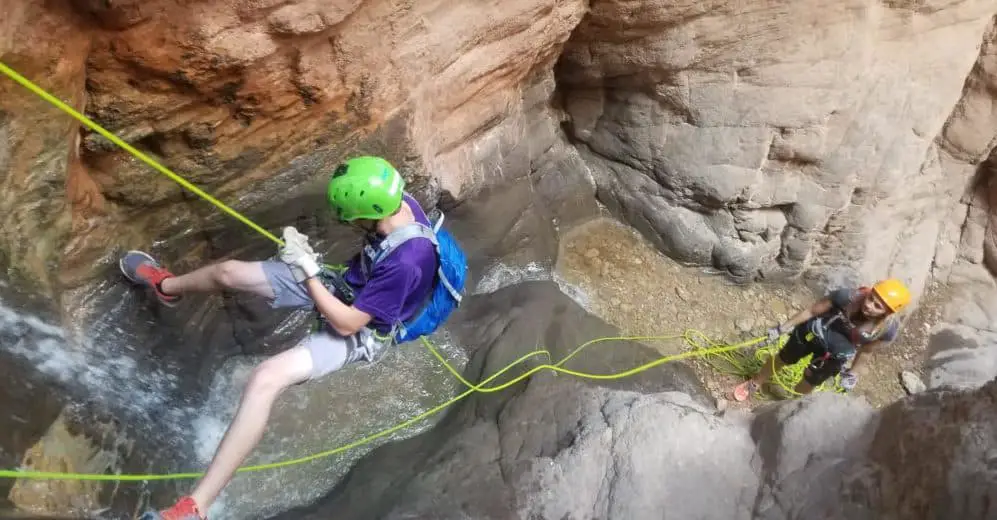
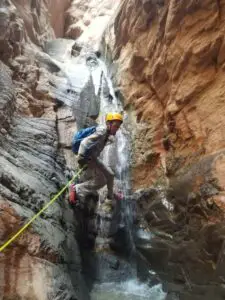
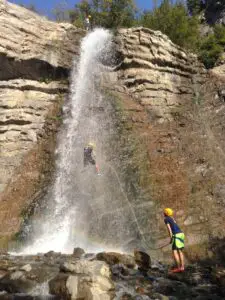
- Waterfall rappel– rappelling through falling water, sometimes into pools. Generally part of canyoneering, but also a fun way to explore any waterfall

Different Uses for Rappelling
Canyoneering (Canyoning)- A canyon without a rappel is basically just a hike. Canyoneering involves fixing ropes to various kinds of anchors and following a wet or dry river downstream. You will hike and downclimb the short drops, but anything greater than 6-10 ft. requires technical rappelling. Search and Rescue teams need to be very skilled in creating anchors and rappelling in order to reach hikers and canyoneers who fall off of ledges and cliffs.
Mountaineering- Many of the techniques are similar to canyoneering, but they are practiced in an alpine environment instead of in a river. Mountaineers fix rappels to not only drop down cliff faces, but also to secure themselves to the mountains in slippery conditions.
Caving (Spelunking)- Most serious caves require some sort of controlled descent. In caving, you leave the ropes tied to the top of the rappels and then use ascenders to climb up the rope in order to exit. One of the biggest rappelling risks when caving is that you probably can’t see the bottom in the darkness. Always tie a stopper knot in the bottom of the rope so you don’t drop off the end if the rappel ends up being longer than your rope.
Industrial/Professional- Maintenance, Construction, Welding, Inspection, Painting, Tree Care. The real-world day-to-day uses for rappelling are endless. Most professionals use a full body harness, rather than a climbing harness for the added support and comfort, and they always use belay devices that can lock off so they can do the work they’re there to do in the vertical world.
See Also:
How to Rappel Without Leaving Gear
Top 10 Most Common Rappelling Accidents- How to Stay Safe Rappelling